ADVERTISEMENT
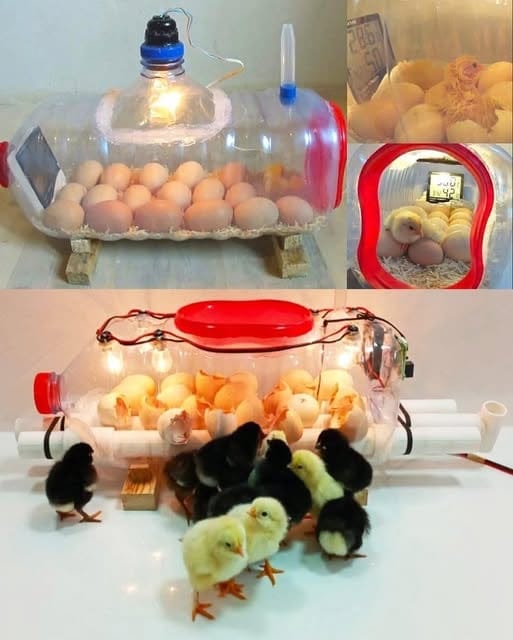
In recent years, the interest in sustainable living and self-sufficiency has surged. Many individuals are now exploring the joys of raising backyard chickens, which not only provide fresh eggs but also contribute to a more eco-friendly lifestyle. But what happens when your flock lays eggs that you want to incubate? If you’re looking for a cost-effective solution and are eager to dive deep into the art of incubation, you’re in luck! In this guide, we’ll explore how to build a homemade egg incubator using a simple water bottle. With minimal materials and a little creativity, you’ll create a functional incubator that can house your eggs and ensure they hatch into healthy chicks.
Understanding the Basics of Incubation
Before we delve into the building process, it’s essential to understand the key principles of incubation. Incubation is the process of maintaining an environment suitable for the development of a fertilized egg until it hatches. The critical factors in maintaining this environment are:
Temperature: Most eggs require a temperature of around 99.5°F (37.5°C) during the incubation period.
Humidity: Humidity levels should be maintained at around 40-50% for the majority of the incubation period, raising to 65-70% in the final days leading up to hatching.
Ventilation: Proper air circulation is crucial, as embryos need oxygen and must expel carbon dioxide.
Turning the eggs: Eggs should be turned at least three times a day (more is better) to ensure that the embryos develop properly and don’t stick to the sides of the shell.
Materials You’ll Need
Creating a homemade egg incubator using a water bottle is an ingenious way to recycle while also fulfilling a practical need. Here’s a list of materials you’ll need to gather for this project:
Large Plastic Water Bottle (2 or 5-gallon size): This will be the main body of your incubator.
Egg Tray or Foam: Used for egg placement, ensuring they’re secure and turning them is easy.
Thermometer & Hygrometer: To monitor the temperature and humidity levels accurately.
Light Bulb and Socket: A small incandescent bulb (40-60 watts) will provide heat.
Computer Fan or Small Ventilator: For air circulation (optional but highly recommended).
Plastic or Duct Tape: For sealing gaps and securing components.
Small Containers of Water: Used to create humidity within the incubator.
Thermal Insulation Material: Such as Styrofoam or bubble wrap (optional, but can improve efficiency).
Eggs: Fertilized eggs that you wish to incubate.
Step-by-Step Instructions to Build Your Incubator
Now that you have all the materials, let’s get started on constructing your egg incubator.
continued on next page
ADVERTISEMENT
