Few household problems are as frustrating as a toilet that won’t flush properly. When you’re faced with weak flushing power and poor suction, it’s tempting to immediately call a plumber—but that call could cost you anywhere from $100 to $300 for what might be a simple fix you can handle yourself.
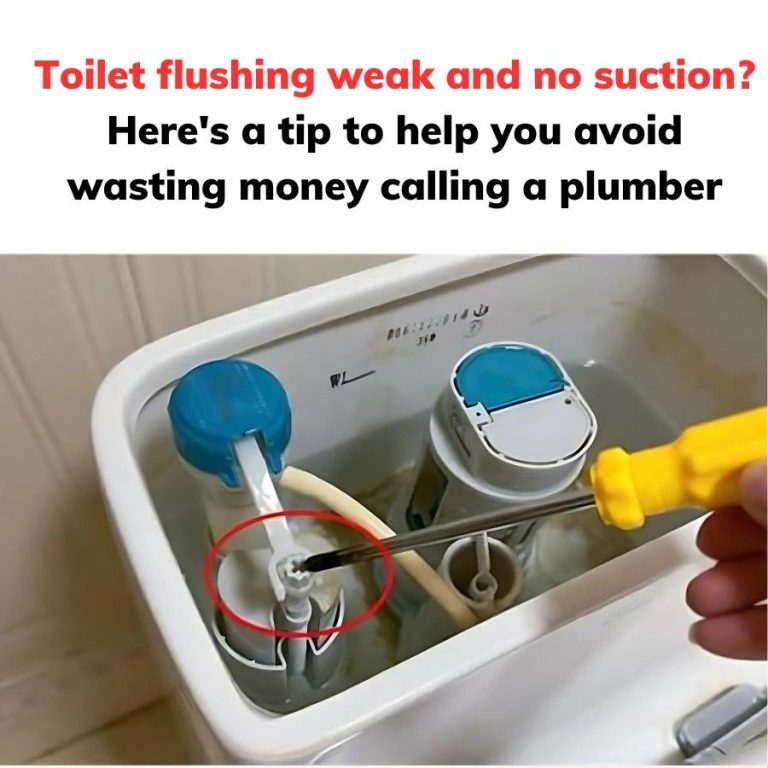
The image shows one of the most common and easily fixable causes of weak toilet flushing: mineral buildup in the rim jets and siphon jet. Before you reach for your phone to call a professional, try this simple DIY solution that could save you significant money and solve your problem in minutes.
Understanding How Your Toilet Works
To understand the fix, it helps to know the basics of how a toilet flush system operates:
When you press the flush lever, it lifts a flapper valve at the bottom of the tank
Water rushes from the tank into the bowl through rim holes and a larger siphon jet
The rush of water creates a siphoning action that pulls waste down the drain
Fresh water refills the tank and bowl, preparing for the next flush
If any part of this system is compromised—particularly the water flow paths—your flush power suffers dramatically.
The Hidden Culprit: Mineral Buildup
Over time, minerals in your water (especially in hard water areas) can accumulate in the small holes under the toilet rim and in the larger siphon jet at the bottom of the bowl. This buildup gradually restricts water flow, leading to:
Weak flush power
Poor suction
Incomplete waste removal
Frequent clogging
The need to flush multiple times
The restricted flow is like trying to spray a garden hose with your thumb partially covering the opening—you can’t get the volume of water needed for a powerful flush.
The Simple DIY Solution
As shown in the image, the solution involves cleaning out these mineral deposits using basic household tools. Here’s what you’ll need:
Tools Required:
Small mirror (to see under the rim)
Screwdriver or Allen wrench (as shown in the image)
Wire coat hanger or plumber’s snake (optional)
White vinegar
Baking soda (optional)
Toilet brush
Rubber gloves
Step-by-Step Instructions:
1. Prepare the Toilet
Turn off the water supply to the toilet (usually a valve near the floor)
Flush to empty most of the water from the bowl
For better access, you can sponge out remaining water (wear gloves!)
2. Locate the Jets
Use a small mirror to inspect under the toilet rim to find the small jet holes
Look at the bottom of the bowl for the larger siphon jet (typically at the front)
Note any visible mineral buildup (often appears white, green, or rusty)
3. Clean the Rim Jets
Use a small screwdriver, Allen wrench, or similar tool to gently probe each jet hole
Carefully scrape away visible mineral deposits
Be gentle to avoid damaging the porcelain
Work around the entire rim, clearing each hole
4. Clean the Siphon Jet
As shown in the circled area of the image, use the screwdriver or Allen wrench to clear the larger siphon jet at the bottom of the toilet bowl
This is often the most critical part of the cleaning process, as this jet provides the main flushing power
Gently but firmly scrape away any mineral buildup around and inside the opening
5. Dissolve Remaining Deposits
Pour 1-2 cups of white vinegar into the toilet bowl
Let it sit for 2-4 hours (overnight is even better)
For stubborn deposits, make a paste of baking soda and vinegar and apply it directly to the jets
Use an old toothbrush to scrub under the rim and around the siphon jet
6. Test and Repeat if Necessary
Turn the water supply back on
Flush the toilet to test the improvement
If needed, repeat the cleaning process for stubborn buildups
Continued on next page
